遠近感をもったオブジェクトのレンダリング
Home > Maya Lesson
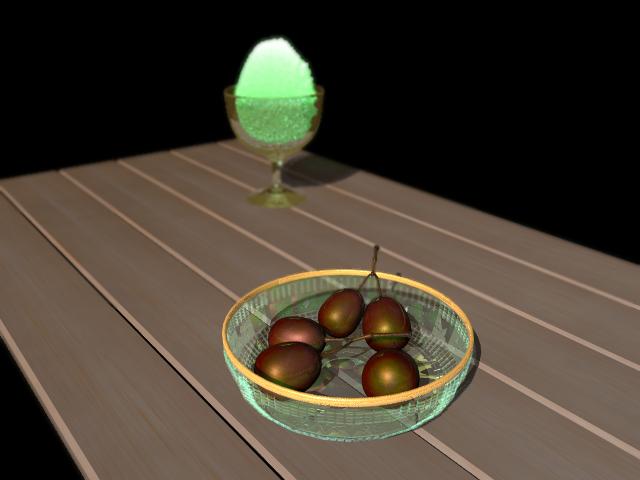
遠近感をもったオブジェクトのレンダリングシーンはテーブル、クラス器、ぶどうなど簡単なオブジェクトで構成します。
●グラス器の制作
プリントを参考にしてグラス器を作る以下の説明はMaya5.0によるものです
■ ガラスの材質(本の付録の例)
Hypershadeを表示● 基本設定
Create/Materials/Phongphong1ノードをダブルクリックしてアトリビュートエディタを開く。
Common Material Attributes項目内で
Color右の[ ] 内をクリックしてColor Chooserを表示
H 241.35 S 0.113 V 0.186 (ダークブルー)
Transparency右の[ ] 内をクリックしてColor Chooserを表示
H 215.61 S 0.337 V 0.500 (鈍い青)
Diffuse 0.240
● 半透明の設定
Translucence: 0.634 右のチェックボタンをクリックCreate Render Nodeダイアローグが表示される。
3D Textures項目内でSolid fractalをクリック
solidFractal1タブ
Solid Fractal Attributes項目内
Threshold: 0.000
Amplitude: 1.000
Ratio: 0.707
Frequency Ratio: 2.000
Ripples: 1.000 1.000 1.000
Depth: 0.000 8.000
Bias: 0.000
p3d_trans(place3dTexture1)タブ
Transform Attributes
Translate: -11.850 0.000 -18.769
Rotate: 0.000 0.000 0.000
Scale: 8.000 8.000 8.000
Shear: 0.000 0.000 0.000
[x] Inherits Transform
● place3dTexture横の [>ボタンを2回クリックして
もとのphong1タブに戻る。
Translucence Depth: 0.500Translucence Focus: 0.500
Specular Shading項目
Cosine Power: 36.690
Specular Color右の[ ] 内をクリックしてColor Chooserを表示
H 19.89 S 0.185 V 0.895 (ライト黄赤)
Reflectivity: 0.550
Reflected Color: 黒
■ ガラスの材質(独自例)
Hypershadeを表示● 基本設定
Create/Materials/Phongphong1ノードをダブルクリックしてアトリビュートエディタを開く。
Common Material Attributes項目内で
Color右の[ ] 内をクリックしてColor Chooserを表示、V 0.3〜0.5 (0.5)
Transparency右の[ ] 内をクリックしてColor Chooserを表示
H 197.51 S 0.209 V 0.895 (うすい青)
Diffuse 0.240
● 半透明の設定
Translucence: 0.470 右のチェックボタンをクリックCreate Render Nodeダイアローグが表示される。
3D Textures項目内でSolid fractalをクリック
solidFractal1タブ
Solid Fractal Attributes項目内
Threshold: 0.000
Amplitude: 1.000
Ratio: 0.707
Frequency Ratio: 2.000
Ripples: 1.000 1.000 1.000
Depth: 0.000 8.000
Bias: 0.000
p3d_trans(place3dTexture1)タブ
Transform Attributes
Translate: 12.204 4.000 4.929
Rotate: 0.000 0.000 0.000
Scale: 4.000 4.000 4.000
Shear: 0.000 0.000 0.000
[x] Inherits Transform
● place3dTexture横の [>ボタンを2回クリックして
もとのphong1タブに戻る。
Translucence Depth: 0.500
Translucence Focus: 0.500
Specular Shading項目
Cosine Power: 35.000
Specular Color右の[ ] 内をクリックしてColor Chooserを表示
H 144.36 S 0.353 V 0.949 (ライトグリーン)
Reflectivity: 0.500
Reflected Color: 黒
■ 材質をモデリングしたポリゴンオブジェクトに設定する
Window/Outlinerでガラス部分を選択するHypershade/Work Area/phong1の下三角しるしをクリック
Assign Material to Selection
■ 金色のふち
HyperShade● 基本設定
Create/Materials/BlinnダブルクリックしてAttribute Editorを表示
Common Material Attributes/Color [ ]内をクリック
Color Chooser/H 19.89 S 0.185 V 0.000 暗くする
Diffuse 0.800
Translucence 0.000
Translucence Depth 0.500
Translucence Focus 0.500
Specular Shading項目内
Eccentricity 0.264
Specluar Roll Off 0.355
Specular Color [ ] 内をクリックしColor Chooserを表示する
H 30.00 S 0.667 V 3.000(スライダでは設定できないが数値では指定できる)
● 金属の写りこみの設定
Reflectivity 0.421Reflected Color [ ] 右のチェックボタンをクリックする
Create Render Nodeダイアログ
Environment Textures項目内
Env Ballをクリック
Environment Ball Attributes項目内で
Image [ ] 右のチェックボタンをクリックする
Texturesタブ/2D Textures
◎ Normal
Rampをクリック
ramp1タブ
Ramp Attributes項目内
Type: Diagonal Ramp
Interpolation: Smooth
黒灰白黒灰黒のランプ(傾斜)を作る
Selected Color H 19.89 S 0.185 V 0.000(黒)
Selected Position 1.000
U Wave 0.000 V Wave 0.000 Noise 0.000 Noise Freq 0.500(以下不変)
ランプ内をクリックして指定点を追加する
Selected Color H 19.89 S 0.000 V 0.439(灰)
Selected Position 0.775
Selected Color H 19.89 S 0.000 V 0.966(白)
Selected Position 0.500
Selected Color H 19.89 S 0.000 V 0.502(灰)
Selected Position 0.260
Selected Color H 19.89 S 0.000 V 0.000(黒)
Selected Position 0.015
Hypershade内のWork Areaにあるblinn1ノードをクリック
Hypershade/Graph/Input and Output Connectionsを選択
Hypershade/Work Areaにコネクション図が表示される
blinn1->blinn1SGの名前をBlinnGold->gold_Goldに変更する
■ 材質をモデリングしたポリゴンオブジェクトに設定する
Window/Outlinerで金属のふちを選択するHypershade/Work Area/BlinnGoldの下三角しるしをクリック
Assign Material to Selection
●カキ氷の制作
ガラスの器を作ったcurve1をコピーして変形Surface/Revolveとして
氷の塊を作る
Create/Materials/Blinn
blinn1タブ
Common Material Attributes項目
Color: 黒、横のチェックをクリック
2D Textures/ramp
ramp1タブ
Ramp Attributes
Type: U Ramp
Interpolation: Linear
濃い緑、濃い緑、緑、薄い緑のrampを作る
blinn1を氷の塊にアサインしてみる
上が白っぽくなっていればよい
氷の粒が集まっている状態を濃淡によって実際の凸凹を作る
Displacement Mat.によって以下のようにして表現する
blinn1SGアイコンをダブルクリック
blinn1SGタブ
Shading Group Attributes項目
Displacement Mat.横のチェックアイコンをクリック
2D Textures/File
file2タブ
File Attributes項目
Image Name横のフォルダアイコンをクリック
sourceimages/icebw.bmpを選択/Open
氷の透明度を上方になるほど透明度が上がるように調整する
blinn1タブに戻って
Transparency: 黒、横のチェックをクリック
2D Textures/Ramp
濃い緑、濃い緑、緑、薄い緑のrampを作る
上方にある氷の粒は光を浴びて白っぽく輝くので
Incandescenceに次のような設定をする
blinn1タブに戻って
Incandescence: 黒、横のチェックをクリック
2D Textures/Ramp
濃い緑、濃い緑、緑、薄い緑のrampを作る
Diffuse: 0.200
Specular Shading項目
Eccentricity: 0.200
Specular Roll Off: 0.700
Specular Color: 白->Colorと同じ
Reflectivity: 0.000
Reflected Color: 黒
テーブルの上にグラス器とぶどう、カキ氷を前後に配置する。
前に置いたぶどうにカメラの焦点をあわせ、後ろは被写界深度外にして
自然にぼけた感じにレンダリングする
●被写界深度ボケ(DOF)の設定
View/Camera Attribute Editor/perspShapeタブDepth of Field項目
[x] Depth of Fieldにチェック
Focus Distance: 24.000など調整する。
ピントが合う位置までのカメラからの距離、これを測るには
Display/Heads Up Display/Object Detailsにチェックをいれると
その後選択したオブジェクトまでの距離が表示されるのでその値を使う。
F Stop: 10.000など調整する。
被写界深度の範囲。大きいほど広い範囲でピントが合う。
Focus Region Scale: 1.000など調整する。
ピントの合う範囲にスケールをかける。大きいほど被写界深度ボケが少なくなる。